ダイアログの基本 で説明したように、Dialog クラスを使用した会話フローでは、ユーザーからメッセージを受け取るたびに DialogContext#continueDialog() を呼び出すことで、1 ステップずつ処理を進めていきます。
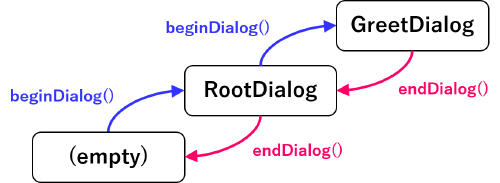
ダイアログには、スタック構造で会話を管理する仕組みがあり、次のようなメソッドを使って、ダイアログの起動(スタックに積む)、ダイアログの終了(スタックから降ろす)という操作を行うことが可能です。
DialogContext#beginDialog("ID")… ダイアログを開始する(スタックに積む)DialogContext#endDialog()… アクティブなダイアログを終了する(スタックから降ろす)DialogContext#replaceDialog("ID")… アクティブなダイアログを別のダイアログに置き換える(スタックの一番上を入れ替え)DialogContext#cancelAllDialog()… すべてのダイアログを終了する(スタックをクリア)
ここでは、RootDialog と GreetDialog という名前の 2 つのダイアログクラス作成し、RootDialog から GreetDialog を起動してダイアログのスタックを積むような実装を行ってみます。
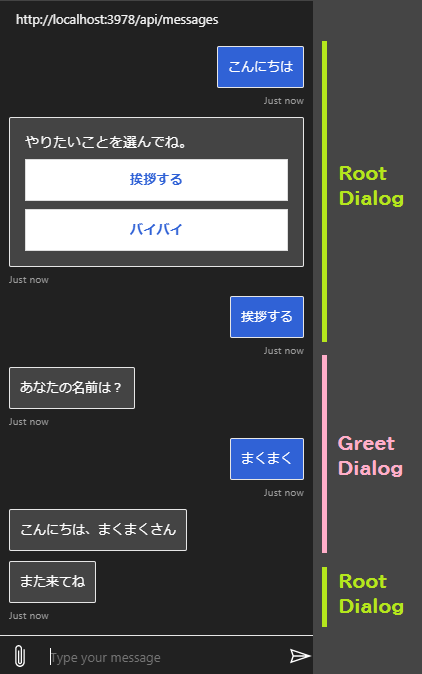
下記は、実際のチャットクライアントの表示例です。
右側のバーで示すように、 最初に RootDialog による選択肢が表示され、次に GreetDialog の処理に遷移し、最後に RootDialog に戻ってくるという流れです。
下記は、最初に起動される RootDialog クラスの実装です。
前回の説明 で使用した DialogBot クラスを使って RootDialog を起動することを想定しています。
ウォーターフォールダイアログの最初のステップ (_step1) として、ユーザーに選択肢を提示し、「挨拶する」を選んだ場合に、GreetDialog を新たに起動するようにしています。
const {
  ChoiceFactory,
  ChoicePrompt,
  ComponentDialog,
  ListStyle,
  WaterfallDialog,
} = require('botbuilder-dialogs');
const { GreetDialog } = require('./greetDialog.js');

/**
 * 会話のエントリポイントとなるルートダイアログ。
 */
exports.RootDialog = class RootDialog extends ComponentDialog {
  constructor() {
    super('RootDialog');

    // Create dialog instances
    this.greetDialog = new GreetDialog();
    this.choicePrompt = new ChoicePrompt('choicePrompt');
    this.choicePrompt.style = ListStyle.heroCard;

    // Add control flow dialogs and prompts
    this.addDialog(new WaterfallDialog('start', [
      this._step1.bind(this),
      this._step2.bind(this),
      this._step3.bind(this)
    ]));
    this.addDialog(this.greetDialog);
    this.addDialog(this.choicePrompt);
  }

  async _step1(step) {
    return await step.prompt(this.choicePrompt.id, {
      prompt: 'やりたいことを選んでね。',
      choices: ChoiceFactory.toChoices(['挨拶する', 'バイバイ'])
    });
  }

  async _step2(step) {
    const text = step.result.value;
    const ctx = step.context;
    if (text.match(/挨拶/)) {
      return await step.beginDialog(this.greetDialog.id);
    } else {
      await ctx.sendActivity('さようなら');
      return await step.endDialog();
    }
  }

  async _step3(step) {
    const ctx = step.context;
    await ctx.sendActivity('また来てね');
    return await step.endDialog();
  }
};下記は、RootDialog から起動される(スタックに積まれる) GreetDialog の実装です。
ユーザーに名前の入力を促し、ユーザーに対して挨拶をしたらダイアログを終了します。
const { ComponentDialog, TextPrompt, WaterfallDialog, } = require('botbuilder-dialogs');

/**
 * 挨拶を行うダイアログ。
 */
exports.GreetDialog = class GreetDialog extends ComponentDialog {
  constructor() {
    super('GreetDialog');

    // Create dialog instances
    this.namePrompt = new TextPrompt('namePrompt');

    // Add control flow dialogs and prompts
    this.addDialog(new WaterfallDialog('start', [
      this._nameStep.bind(this),
      this._lastStep.bind(this)
    ]));
    this.addDialog(this.namePrompt);
  }

  async _nameStep(step) {
    return await step.prompt(this.namePrompt.id, 'あなたの名前は?');
  }

  async _lastStep(step) {
    const text = step.result;
    const ctx = step.context;
    await ctx.sendActivity(`こんにちは、${text}さん`);
    return await step.endDialog();
  }
};
2 つのダイアログクラスは、自分が担当する会話のトピックのみに集中して実装できているところがポイントです。 このようなダイアログクラスを作成し、組み合わせていくことで、柔軟な会話を表現できるようになっていきます。
関連記事
- チャットボット: Bot Builder SDK で画像やリストなどのリッチなメッセージを送る (MessageFactory)
- チャットボット: Bot Builder SDK の Dialog で会話の流れをデザインする (1) ダイアログの基本
- チャットボット: Bot Builder SDK で会話の状態を保存する (BotState)
- チャットボット: ユーザーの参加/離脱のイベントをハンドルする
- チャットボット: Bot Builder SDK で会話の状態を保存する (Storage)
- チャットボット: ActivityHandler でボットのイベントハンドラ実装を簡略化する
- LUIS (4) botbuilder-ai ライブラリを使って LUIS の API を利用する