参照するサンプルコード
Azure の Cosmos DB を SQL API で操作するための最初の手順は下記のドキュメントに記載されています。
ここに Node.js 用のサンプルコードがあり、@azure/cosmos パッケージが提供する CosmosClient クラスを使用したコードになっています(昔のサンプルコードでは documentdb というライブラリを使用していたりしますが、今は Microsoft が提供する @azure/cosmos を使用すると完結なコードを記述できます)。
const CosmosClient = require('@azure/cosmos').CosmosClient;基本的には、config.js ファイルに記述されたエンドポイントとキーを下記のような感じで設定すれば実行できるようになるのですが、
var config = {};
config.endpoint = 'https://your-cosmosdb.documents.azure.com:443/';
config.key = '9Hp4WSwgvggexAuGy4dKdl...snipped...lV9Nm44Pg8WVkH==';
会社などのプロキシ環境内からだとうまく接続できず、次のような感じのエラーが発生すると思います。
$ node app.js
Completed with error {"message":"request to https://your-cosmosdb.documents.azure.com:443/dbs/FamilyDatabase failed, reason: connect ETIMEDOUT 123.34.56.78:443","type":"system","errno":"ETIMEDOUT", "code":"ETIMEDOUT","headers":{"x-ms-throttle-retry-count":0,"x-ms-throttle-retry-wait-time-ms":0}}
HTTPS_PROXY 環境変数を設定しても同様で効果がありません。
プロキシ経由で CosmosClient を使用する
CosmosClient クラスでの Cosmos DB へのアクセスをプロキシ経由で行うには、コンストラクタのパラメータとして渡せる CosmosClientOptions の agent プロパティを設定します。
ここでは、エージェントとして proxy-agent モジュールを使用します。
$ npm install --save proxy-agentconst { CosmosClient } = require('@azure/cosmos');
const ProxyAgent = require('proxy-agent');
// HTTP, HTTPS, or SOCKS proxy to use
const PROXY_URI = 'http://proxy.example.com:3128/';
const client = new CosmosClient({
endpoint: config.endpoint,
key: config.key,
agent: new ProxyAgent(PROXY_URI)
});プロキシを使用するかどうかを簡単に切り替えられるようにするには、例えば、AZURE_PROXY 環境変数に URI がセットされていたら、それをプロキシアドレスとして使用する、というように処理を分けるとよいでしょう。
const { CosmosClient } = require('@azure/cosmos');

const options = {
  endpoint: config.endpoint,
  key: config.key
};

// AZURE_PROXY 環境変数がセットされていたらプロキシ経由のアクセスにする
if (process.env.AZURE_PROXY) {
  const ProxyAgent = require('proxy-agent');
  options.agent = new ProxyAgent(process.env.AZURE_PROXY);
}

const client = new CosmosClient(options);
あとは、普通に CosmosClient インスタンスを使用して API を呼び出すだけです。
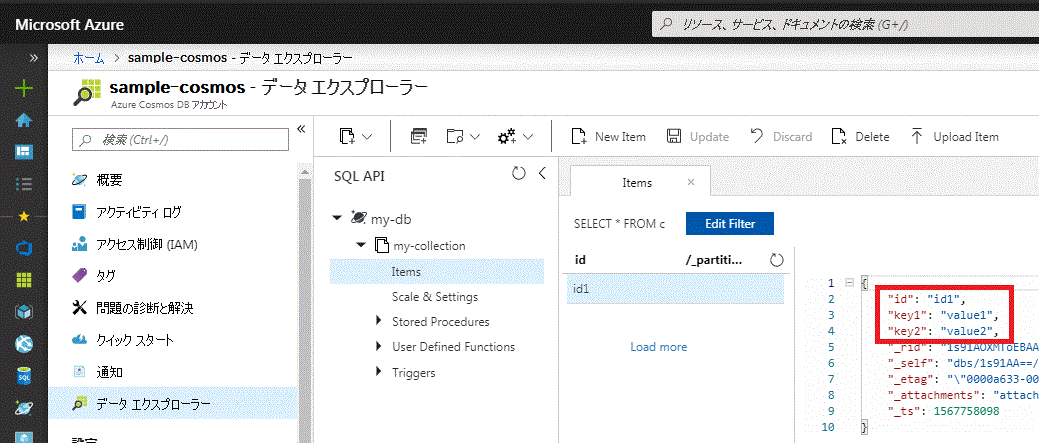
my-db データベースの my-collection コレクションに、適当な JSON データを格納してみます。
async function createItem(item) {
  // Create the database if it does not exist
  const { database } = await client.databases.createIfNotExists({ id: 'my-db' });

  // Create the container if it does not exist
  const { container } = await database.containers.createIfNotExists({ id: 'my-collection' });

  // Create the item if it does not exist
  const { resource } = await container.items.upsert(item);
}

// コレクションに追加してみる
const item = { id: 'id1', key1: 'value1', key2: 'value2' };
createItem(item).catch(err => {
  console.error(err);
});
Azure ポータル から Cosmos DB の データエクスプローラー を開くと、my-db データベースの my-collection コレクションにアイテムが追加されていることを確認できます。

関連記事
- Azure Cosmos DB にアカウントを作って MongoDB API でアクセスする
- Azure Speech Service を使って音声をテキストに変換する (STT)
- チャットボット: 独自のミドルウェアを作成してログを記録する
- チャットボット: 独自のミドルウェアを作成して禁止ワードを拒否するようにする
- チャットボット: Bot Builder SDK の Dialog で会話の流れをデザインする (2) スタック管理
- チャットボット: Bot Builder SDK で画像やリストなどのリッチなメッセージを送る (MessageFactory)
- チャットボット: Bot Builder SDK の Dialog で会話の流れをデザインする (1) ダイアログの基本