
Dialog を使わない会話管理
Bot Builder SDK の UserState や ConversationState を使う と、ユーザーや会話ごとの状態管理を行うことできるため、複数回のやりとりが必要な会話を実現することができます。
例えば、下記のような会話ができるボットを実装してみます。
User: こんにちは
 Bot: あなたの名前は?
User: まく
 Bot: こんにちは まく さん
User: おやすみなさい
 Bot: また来てね まく さん
次のボット実装は、UserState クラスを使って、pos という名前のプロパティを作成し、会話がどこまで進んでいるかを管理しています。
const { ActivityHandler, UserState } = require('botbuilder');

class MyBot extends ActivityHandler {
  constructor(storage) {
    super();
    this._createStateObjects(storage);
    this.onMessage(async (context, next) => {
      const prop = await this.nameProp.get(context, { pos: 'init' });

      // プロパティの 'pos' により処理を分岐させる
      if (prop.pos === 'init') {
        prop.pos = 'askName';
        await context.sendActivity('あなたの名前は?');
      } else if (prop.pos === 'askName') {
        prop.pos = 'end';
        prop.name = context.activity.text;
        await context.sendActivity(`こんにちは ${prop.name} さん`);
      } else {
        prop.pos = 'init';
        await context.sendActivity(`また来てね ${prop.name} さん`);
      }

      // プロパティに保存
      await this.nameProp.set(context, prop);
      await this.userState.saveChanges(context);
    });
  }

  // 状態管理用のオブジェクトを作成
  _createStateObjects(storage) {
    this.userState = new UserState(storage);
    this.nameProp = this.userState.createProperty('name');
  }
}

exports.MyBot = MyBot;会話の流れに従って、pos プロパティの値は init → askName → end と変化していきます(最後に init に戻る)。
このように、UserState を使った状態管理だけでも、会話の流れを表現することはできるのですが、こんな状態管理を各トピックごとに実装するのは非常に骨が折れます。
そこで Bot Builder SDK は、Dialog という会話の流れを簡潔に実装するための便利クラスを用意しています。
Dialog を使った会話管理
ここでは、順序通り会話を進めるためのダイアログである WaterfallDialog を使います。
BotBuilder SDK の提供するダイアログ系クラスを使用するには、botbuilder-dialogs パッケージをインストールしておく必要があります。
$ npm install --save botbuilder-dialogs下記は、WaterfallDialog を使って、ユーザーから名前を聞き出すボットの実装例です。
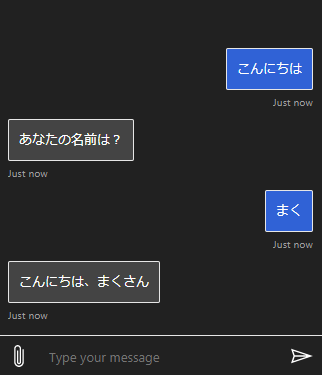
大まかな流れは次のような感じになります。
- ボット起動時に
DialogSetに必要なDialog(会話トピックごとの実装)をセットアップする。 - ユーザーからのメッセージを受信 (
ActvityHandler#onMessage) するたびに、DialogContext#continueDialog()を呼び出して、処理を 1 ステップずつ進める。
const { ActivityHandler, UserState } = require('botbuilder');
const { DialogSet, DialogTurnStatus, TextPrompt, WaterfallDialog } = require('botbuilder-dialogs');

// 最初に起動するダイアログの名前
const USER_PROFILE_DIALOG = 'userProfileDialog';

class MyBot extends ActivityHandler {
  constructor(storage) {
    super();
    this.userState = new UserState(storage);
    this.userProfile = this.userState.createProperty('userProfile');
    this._setupDialogSet(this.userProfile);

    this.onMessage(async (context, next) => {
      // Create DialogContext for the current turn
      const dc = await this.dialogSet.createContext(context);
      // Try to continue executing an active multi-turn dialog
      const ret = await dc.continueDialog();
      // Send greeting if no other dialogs active
      if (ret.status == DialogTurnStatus.empty) {
        await dc.beginDialog(USER_PROFILE_DIALOG);
      }
      await next();
    });

    this.onDialog(async (context, next) => {
      // ダイアログスタックの状態を保持するためにこのコードが必要
      await this.userState.saveChanges(context);
      await next();
    });
  }

  _setupDialogSet(propertyAccessor) {
    // Create a dialog set to manage all dialogs
    this.dialogSet = new DialogSet(propertyAccessor);

    // Add dialogs
    this.dialogSet.add(new WaterfallDialog(USER_PROFILE_DIALOG, [
      async (step) => {
        return await step.prompt('askName', 'あなたの名前は?');
      },
      async (step) => {
        const name = step.result;  // 前のステップの結果を取得
        await step.context.sendActivity(`こんにちは、${name}さん`)
        return await step.endDialog();
      }
    ]));

    // Add prompts
    this.dialogSet.add(new TextPrompt('askName'));
  }
}

exports.MyBot = MyBot;
ポイントは、コンストラクタから呼び出している _setupDialogSet() メソッドで、この中で DialogSet というダイアログ群を管理するオブジェクトを構築しています。
DialogSet のコンストラクタには、ダイアログの状態を管理するための、StatePropertyAccessor オブジェクトを渡します。
このオブジェクトは、UserState#createProperty() あるいは ConversationState#createProperty() で作成できます。
_setupDialogSet(propertyAccessor) {
  // Create a dialog set to manage all dialogs
  this.dialogSet = new DialogSet(propertyAccessor);

  // Add prompts
  this.dialogSet.add(new TextPrompt('askName'));

  // Add dialogs
  this.dialogSet.add(new WaterfallDialog(USER_PROFILE_DIALOG, [
    async (step) => {
      return await step.prompt('askName', 'あなたの名前は?');
    },
    async (step) => {
      const name = step.result;  // 前のステップの結果を取得
      await step.context.sendActivity(`こんにちは、${name}さん`)
      return await step.endDialog();
    }
  ]));
}
DialogSet#add() を使い、ボットが使用する一連の Dialog を追加しておく必要があります。
ここでは、SDK が提供する WaterfallDialog と TextPrompt という Dialog オブジェクトを追加しています。
TextPrompt はユーザーにテキストの入力を促すための Dialog 実装です(正確には Dialog を継承した Prompt クラスを継承しています)。
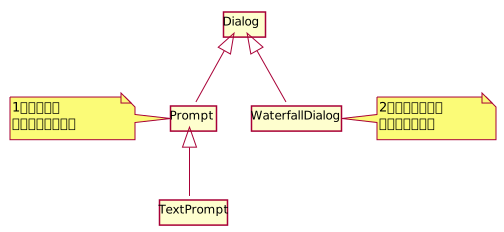
TextPrompt は WaterfallDialog の処理の中から使用するのですが、後から呼び出すために名前を付けて DialogSet に追加しておく必要があります。
名前は DialogSet 中で一意であれば OK です(ここでは、askName という名前を付けています)。
this.dialogSet.add(new TextPrompt('askName'));起点となる WaterfallDialog の方も名前を付けて DialogSet に追加します。
そして、第2引数のコールバック配列で、各ステップのボット応答を実装します。
各ステップには WaterfallStepContext が渡され、これを使って各ステップをどう進んでいくかを定義します。
上記の例では、最初のステップとして、ユーザーに名前の入力を促すためのプロンプト (TextPrompt) を表示するように指定しています。
async (step) => {
  return await step.prompt('askName', 'あなたの名前は?');
},
最初のパラメータで、あらかじめ登録しておいた askName というプロンプト名を指定しています。
ユーザーが名前を入力すると、今度はその次に指定したコールバックが呼び出されます。
このようなステップ連鎖を実装していき、最後に endDialog() でダイアログ全体の処理を完了します。
async (step) => {
  const name = step.result;  // 前のステップの結果を取得
  await step.context.sendActivity(`こんにちは、${name}さん`)
  return await step.endDialog();
}
step.result には、前のステップでユーザーが入力したテキストが格納されています。
ここでは、その名前を表示して、全体のダイアログ処理を終了 (step.endDialog()) しています(実際には、必要に応じて UserState に保存したりします)。
この WaterfallDialog を起動するエントリポイントとなっているのは、ボットクラスの onMessage ハンドラです。
this.onMessage(async (context, next) => {
  // Create DialogContext for the current turn
  const dc = await this.dialogSet.createContext(context);

  // Try to continue executing an active multi-turn dialog
  const ret = await dc.continueDialog();

  // Send greeting if no other dialogs active
  if (ret.status == DialogTurnStatus.empty) {
    await dc.beginDialog(USER_PROFILE_DIALOG);
  }
  await next();
});
現在アクティブになっているダイアログの処理を 1 ステップずつ進めていくには、ボットクラスの onMessage が呼び出されるたびに、DialogContext#continueDialog() を呼び出さなければいけません。
この関数は、戻り値として (DialogTurnResult) オブジェクトを返し、ダイアログの各ステップの結果や、ダイアログ全体の進捗状態を取得することができます。
ダイアログがまだ起動していない(アクティブなダイアログが存在しない)場合は、DialogTurnResult#state プロパティの値が empty となるため、このときに DialogContext#beginDialog() でダイアログを起動するようにします。
これはお決まりの実装パターンです。
最後に忘れてはいけないのが、onDialog ハンドラの実装です。
this.onDialog(async (context, next) => {
  // ダイアログスタックの状態を保持するためにこのコードが必要
  await this.userState.saveChanges(context);
  await next();
});
onDialog ハンドラは各ターンの終わりに呼び出されます。
ダイアログの状態(どのステップまで進んだかという情報)は、BotState オブジェクトで管理されるので、ここで忘れずに保存するようにします。
これを忘れると、WaterfallDialog のステップがいつまでたっても進まなくなります。
Dialog の実装を別クラスに切り出す (ComponentDialog)
ボットクラス(ActivityHandler を継承したクラス)の中に、WaterfallDialog などを使用したダイアログ関連の実装を入れてしまうと、コードが煩雑になってしまいます。
ここでは、ダイアログに関する実装を、Dialog クラスを継承した別クラスとして抽出します。
ダイアログクラス側の実装
ダイアログクラスは、ComponentDialog を継承して作成するのが楽です。
ComponentDialog は Dialog を継承したクラスで、addDialog() を使って自分自身が複数の Dialog(あるいは Prompt)を子ダイアログとして保持することができるようになっています。
下記の UserProfileDialog クラスは、ユーザーの名前と年齢を収集する WaterfallDialog を含んだダイアログクラスの実装例です。
間接的に Dialog クラスを継承しているため、DialogSet に格納して起動することができます。
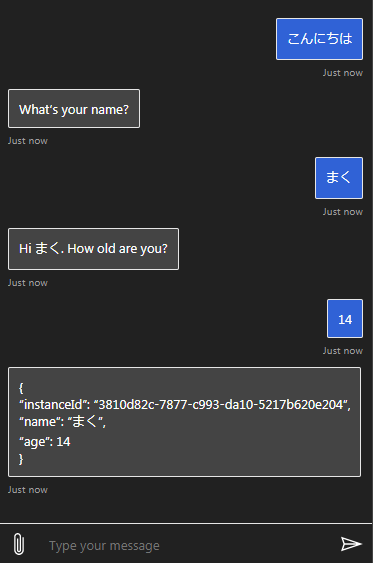
const {
  ComponentDialog,
  NumberPrompt,
  TextPrompt,
  WaterfallDialog,
} = require('botbuilder-dialogs');

exports.UserProfileDialog = class UserProfileDialog extends ComponentDialog {
  constructor() {
    super('UserProfileDialog');

    // Add control flow dialogs(これが最初に起動される)
    this.addDialog(new WaterfallDialog('start', [
      async (step) => {
        // Ask user their name
        return await step.prompt('namePrompt', `What's your name?`);
      },
      async (step) => {
        // Remember the users answer
        step.values['name'] = step.result;

        // Ask user their age.
        return await step.prompt('agePrompt',
          `Hi ${step.values['name']}. How old are you?`);
      },
      async (step) => {
        // Remember the users answer
        step.values['age'] = step.result;

        // End the component and return the completed profile.
        return await step.endDialog(step.values);
      }
    ]));

    // Add prompts
    this.addDialog(new TextPrompt('namePrompt'));
    this.addDialog(new NumberPrompt('agePrompt'));
  }
};
WaterfallDialog の各ステップで渡される WaterfallStepContext パラメータの result プロパティには、前のステップでユーザーから取得した値が含まれています。
values プロパティ(連想配列)に、その値を格納しておくと、次のステップへ値を引き継いでいくことができます。
step.values['name'] = step.result;
最後のステップでダイアログを終了させるときに、収集した値を endDialog() のパラメータとして渡してやることで、ダイアログの起動元へ結果を返すことができます。
return await step.endDialog(step.values);
ボットクラス側の実装
次に、このダイアログクラスを起動するためのボットクラスを作成します。
Microsoft のサンプルコードとして、DialogBot という任意のダイアログを起動するボットクラス実装が紹介されているので、これを参考にすることにします。
サンプルコードでは、ルートの DialogSet に関する処理を、ダイアログクラス側の run() メソッドに実装していますが、特にダイアログクラス側に入れる必要はないと思いますので、ここでは DialogBot 側の実装で DialogSet に関する処理もやってしまうことにします。
ちなみにこの実装では、ダイアログの状態を保存するために、UserState ではなく ConversationState を使っていることに注意してください。
用途によっては使用する BotState オブジェクトを変更する必要があるかもしれません。
const { ActivityHandler } = require('botbuilder');
const { DialogSet, DialogTurnStatus } = require('botbuilder-dialogs');

exports.DialogBot = class DialogBot extends ActivityHandler {
  /**
   * Creates a bot instance.
   *
   * @param {ConversationState} conversationState
   * @param {UserState} userState
   * @param {Dialog} dialog to be shown as a root dialog
   */
  constructor(conversationState, userState, dialog) {
    super();
    if (!conversationState) throw new Error(
      '[DialogBot]: Missing parameter. conversationState is required');
    if (!userState) throw new Error(
      '[DialogBot]: Missing parameter. userState is required');
    if (!dialog) throw new Error(
      '[DialogBot]: Missing parameter. dialog is required');

    this.convState = conversationState;
    this.userState = userState;
    this.dialog = dialog;
    this.dialogSet = new DialogSet(this.convState.createProperty('DialogState'));
    this.dialogSet.add(this.dialog);

    this.onMessage(async (context, next) => {
      // Run the Dialog with the new message Activity.
      const dc = await this.dialogSet.createContext(context);
      const ret = await dc.continueDialog();

      switch (ret.status) {
        case DialogTurnStatus.empty:
          // アクティブなダイアログがない場合は、ダイアログを開始
          await dc.beginDialog(this.dialog.id);
          break;
        case DialogTurnStatus.complete:
          // ダイアログが完了したら、結果をここで表示してみる
          // (通常はダイアログの処理の中で結果を使ってしまえばよい)
          console.debug(ret.result);
          // TODO: Remove this in release build
          await context.sendActivity(JSON.stringify(ret.result, null, 2));
          break;
      }

      // By calling next() you ensure that the next BotHandler is run.
      await next();
    });

    this.onDialog(async (context, next) => {
      // Save any state changes.
      // The load happened during the execution of the Dialog.
      await this.convState.saveChanges(context, false);
      await this.userState.saveChanges(context, false);

      // By calling next() you ensure that the next BotHandler is run.
      await next();
    });
  }
};
この DialogBot クラスは、任意の Dialog を起動するための汎用的なクラスとして使用することができます。
やっていることはとてもシンプルで、onMessage ハンドラの中で、DialogContext#beginDialog() や DialogContext#continueDialog() を呼び出して、対象のダイアログのステップを順番に進めているだけです。
DialogContext#continueDialog() は、ダイアログの進捗具合 (status) や WaterfallDialog の各ステップの結果 (result) を含む DialogTurnResult オブジェクトを返します。
WaterfallDialog のすべてのステップが完了すると(endDialog() が呼び出されると)、status プロパティは completed となり、ダイアログ側から endDialog() で渡された最終結果を result プロパティで参照することができます(DialogTurnResult の中に result プロパティがあるのでちょっとネーミングが気持ち悪い)。
ダイアログ側で収集したユーザー情報は、ダイアログ側の実装で使ってしまえばよいのですが、UserProfileDialog の動作を確認するために、上記のボットクラスではコンソールおよびユーザーへの返答として表示するようにしています。
おまけ: WaterfallDialog の各ステップの登録方法いろいろ
WaterfallDialog の API ドキュメント にも書いてありますが、各ステップのコールバック関数は、コンストラクタの第 2 引数の配列でまとめて渡す以外にも、次のような設定方法があります。
クロージャーとして 1 つずつ追加する方法
const dialog = new WaterfallDialog('myDialog');

dialog.addStep(async (step) => {
  await step.context.sendActivity(`Hello World!`);
  return await step.endDialog();
});
通常の関数を追加する方法(メソッドじゃない関数)
async function stepFunc1(step) {
  await step.context.sendActivity(`Hello World!`);
  return await step.endDialog();
}

dialog.addStep(stepFunc1);
各ステップをメソッド化して this に bind して追加する方法
const dialog = new WaterfallDialog('myDialog');

dialog.addStep(this.stepFunc1.bind(this));
dialog.addStep(this.stepFunc2.bind(this));
dialog.addStep(this.stepFunc3.bind(this));
各ステップをメソッド化してまとめて追加
class RootDialog extends ComponentDialog {
  constructor() {
    super('RootDialog');

    // Add control flow dialogs
    this.addDialog(new WaterfallDialog('start', [
      this._nameStep.bind(this),
      this._lastStep.bind(this)
    ]))

    // Add prompts
    this.addDialog(new TextPrompt('namePrompt'));
  }

  async _nameStep(step) {
    const options = { prompt: '名前を教えてください。' };
    return await step.prompt('namePrompt', options);
  }

  async _lastStep(step) {
    step.values['name'] = step.result;
    await step.context.sendActivity(`こんにちは、${step.values['name']}さん!`);
    await step.context.sendActivity('また来てね!');
    return await step.endDialog(step.values);
  }
}
こんな感じでメソッドで追加する方法がオススメかなぁ。 ダイアログはクラス化して実装したいので。